Showing posts with label Dynamics AX 2009. Show all posts

How to post PO by Code in Dynamics AX

I have task to integrate Dynamics AX with another application by posting PO from out side Dynamics AX, so I used AIF and build new web service to be used from out of AX and call the method below to post PO (packing slip, or invoice) .
public str CreatePostProductReceipt(PurchId _PurchId, Num _PackingSlip, ItemId  Itemid, Qty qty,
InventSiteId  InventSiteId ='', InventLocationId  InventLocationId= '' , inventBatchid batchid = '', InventSerialId  serialId = '', inventsizeId inventsizeId ='', InventColorId InventColorId ='')
{
PurchFormLetter             purchFormLetter;
PurchParmUpdate             purchParmUpdate;
PurchParmTable              purchParmTable;
PurchParmLine               purchParmLine;
PurchTable                  purchTable;
PurchLine                   purchLine;
PurchId                     purchId;
Num                         packingSlipId;
InventDim                   inventDim;
str                 ret='';
System.Exception    err;
;
packingSlipId   = _PackingSlip;
purchTable      = PurchTable::find(_PurchId);
ttsBegin;
try
{
// Create PurchParamUpdate table
purchFormletter = PurchFormLetter::construct(DocumentStatus::PackingSlip); // to post invoice change to DocumentStatus::invoice
purchFormLetter.createParmUpdate(true);
purchParmUpdate = PurchFormLetter.purchParmUpdate();
// Set PurchParmTable table
purchParmTable.clear();
purchParmTable.TransDate                = SystemDateGet();
purchParmTable.Ordering                 = DocumentStatus::PackingSlip;
purchParmTable.ParmJobStatus            = ParmJobStatus::Waiting;
purchParmTable.Num                      = packingSlipId;
purchParmTable.PurchId                  = purchTable.PurchId;
purchParmTable.PurchName                = purchTable.PurchName;
purchParmTable.DeliveryName             = purchTable.DeliveryName;
purchParmTable.OrderAccount             = purchTable.OrderAccount;
purchParmTable.CurrencyCode             = purchTable.CurrencyCode;
purchParmTable.InvoiceAccount           = purchTable.InvoiceAccount;
purchParmTable.ParmId                   = purchParmUpdate.ParmId;
purchParmTable.insert();
// Set PurchParmLine table
while select purchLine
where purchLine.PurchId == purchTable.purchId && purchline.ItemId == Itemid
{
purchParmLine.InitFromPurchLine(purchLine);
inventDim = purchline.inventDim(true);
// Set batch and serial number
if(InventSiteId != '')
inventDim.InventSiteId = InventSiteId;
if(InventLocationId != '')
inventDim.InventLocationId = InventLocationId;
if(batchid != '')
inventDim.inventBatchId = batchId;
if(serialid != '')
inventDim.inventSerialId = serialID;
if(inventsizeId != '')
inventDim.inventsizeId = inventsizeId;
if(InventColorId != '')
inventDim.InventColorId = InventColorId;
purchParmLine.InventDimId = inventDim::findOrCreate(inventdim).inventDimId;
purchParmLine.ReceiveNow    = 1 ; //PurchLine.PurchQty;
purchParmLine.setInventReceiveNow();
purchParmLine.ParmId        = purchParmTable.ParmId;
purchParmLine.TableRefId    = purchParmTable.TableRefId;
purchParmLine.setQty(DocumentStatus::PackingSlip, false, true);
purchParmLine.setLineAmount();
purchParmLine.insert();
}
ttsCommit;
purchFormLetter = PurchFormLetter::construct(DocumentStatus::PackingSlip);
purchFormLetter.transDate(systemDateGet());
purchFormLetter.proforma(false);
purchFormLetter.specQty(PurchUpdate::PackingSlip);
purchFormLetter.purchTable(purchTable);

// This is the ID we hard code as the product receipt ID, if we do the posting via UI
// user would have the option to manually enter this value
purchFormLetter.parmParmTableNum(purchParmTable.ParmId);
purchFormLetter.parmId(purchParmTable.ParmId);
purchFormLetter.purchParmUpdate(purchparmupdate);
purchFormLetter.run();
return "OK";
}
catch (Exception::CLRError)
{
err = CLRInterop::getLastException();
ret = err.ToString();
return ret;
}
Return "Error";
}

How to Call Report from Dynamics AX 2009

After you created your report in AX you can call report from  AX form by follow the below steps:

1- Create menu item with type output by drag and drop report to MenuItems nodes under AOT.

2- Open the form that you need to call report from.

                  Note: the form should be have dataSource with the table in report

3-  Drag and Drop menu Item created in step 1 in the form under any button group.

4- Add the following method to Report

void initFromCaller(Args _args)
{
    str                   QrderId; // field used as Rang and used to filter data
    QueryBuildDataSource  qbds; // should be represent report datasource and selected record in the form

    ;

    if (! _args ||
        ! _args.caller() ||
          _args.dataset() != tablenum(TableName) )
        return;

    QrderId = _args.record().(fieldnum(TableName,FieldName));

    qbds    =  element.query().dataSourceTable(tablenum(TableName));

    if(!qbds.findRange(fieldnum(TableName,FieldName)))
    {
        qbds.addRange(fieldnum(TableName,FieldName)) ;
    }
    qbds.findRange(fieldnum(TableName,FieldName)).value(queryvalue(QrderId));

}

Inventory Closing slow


May The below link lead you to solve Dynamics ax closing slowness issue by creating new indexes in the main tables used in the recalculation and closing process in Dynamics ax.


Inventory Closing slow:


Recalculation Error Dynamics AX 2009

while running inventory recalculation process, I got this error

“Cannot edit a record in stock transactions (InventTrans) An update
conflict occurred due to another user process deleting the record or changing
one or more fields in the record"

solution to avoid this error, go to AOT –> DataDictionary –> Tables ----> InventTrans

right click on table to display properties window then change OccEnabled property to No.

then resume recalculation again, it will work successfully.

image

How to: Override the fetch Method to Filter Data for Reports (MorphX Reporting Tools)–AX 2009

You can override the fetch method to filter the data that is displayed in a report. This override does not reduce the number of records that are returned by the query of the report. Instead it prevents some records from being sent to the final report. Each record is examined by the branching logic you add to the fetch method. Branching determines which records to give to the send method. Those records appear in the final report.

Note

Do not call super() when you override the fetch method in a report.

By default, each record that is returned by the query appears in the report. To reduce the number of records returned, add range restrictions to the query. Report ranges are more efficient than overriding the fetchmethod; however, report ranges are less expressive. For information about adding ranges to queries, see Query Elements in the AOT.

Example


The following code example loops through each record that is returned by the query. The code tests a field in each record and branches to a send method call for records that belong in the report.

In this example, the BankAccountTable table is the only data source for the report. The fetch method in the report is overridden with the following code.

public boolean fetch()
{
boolean retCode = false;
BankAccountTable bankAccountTableRec;
QueryRun qrun;
;
// Use the queryRun object that is associated with the
// report; element refers to the report.
qrun = new QueryRun(element);

// Verify that the report dialog works.
if (! qrun.prompt())
{
return retCode;
}

// Loop through each record from the data source query of the report.
while (qrun.next())
{
// Get the BankAccountTable fields from the query record.
bankAccountTableRec = qrun.get(TableNum(BankAccountTable));

// Exclude ODDBANK from the visible report.
if (bankAccountTableRec.AccountID != "ODDBANK")
{
// Include the current record in the report.
element.send(bankAccountTableRec);
}
}
retCode = true;

// retCode = super(); // Do not call super() when you override the fetch method.
return retCode;
}

Dynamics AX 2009 Workflow does not working

I have faced a problem today at my work, the workflow does not working, and there not PR submitted and any incident is Pending.

I checked every thing and restart AOS Service  but my Issue is not fixed, so I checked Windows event log on server that host Workflow services and I got the bellow error.


Session log on for Microsoft Dynamics failed.

Dynamics Adapter LogonAs failed.

Microsoft.Dynamics.Framework.BusinessConnector.Session.Exceptions.FatalSessionException
   at Microsoft.Dynamics.Framework.BusinessConnector.Session.DynamicsSession.HandleException(String message, Exception exception, HandleExceptionCallback callback)
   at Microsoft.Dynamics.Framework.BusinessConnector.Session.DynamicsBase.HandleExceptionInternal(String message, Exception e)
   at Microsoft.Dynamics.Framework.BusinessConnector.Session.DynamicsAdapter.LogonAs(String user, String domain, NetworkCredential bcProxyCredentials, String company, String language, String objectServer, String configuration)
   at Microsoft.Dynamics.Framework.BusinessConnector.Session.DynamicsAdapter.Microsoft.Dynamics.Framework.BusinessConnector.Adapter.IAxaptaAdapter.LogonAs(String user, String domain, NetworkCredential bcProxyCredentials, String company, String language, String objectServer, String configuration)
   at Microsoft.Dynamics.Framework.Workflow.BusinessConnector.WorkflowSession.OnLogon(IAxaptaAdapter axaptaAdapter)
   at Microsoft.Dynamics.Framework.BusinessConnector.Session.DynamicsSession.Init(ICacheContext context)

Microsoft.Dynamics.BusinessConnectorNet.LogonFailedException
   at Microsoft.Dynamics.BusinessConnectorNet.Axapta.Logon(BC_PROXY_ACCOUNT_INFO* pBCProxyAccountInfo, String company, String language, String objectServer, String configuration)
   at Microsoft.Dynamics.BusinessConnectorNet.Axapta.LogonUsingBCProxyAccount(_SEC_WINNT_AUTH_IDENTITY_W* pImpersonatedUserAccount, NetworkCredential bcProxyCredentials, String company, String language, String objectServer, String configuration)
   at Microsoft.Dynamics.BusinessConnectorNet.Axapta.LogonAs(String user, String domain, NetworkCredential bcProxyCredentials, String company, String language, String objectServer, String configuration)
   at Microsoft.Dynamics.Framework.BusinessConnector.Session.DynamicsAdapter.LogonAs(String user, String domain, NetworkCredential bcProxyCredentials, String company, String language, String objectServer, String configuration)

Solution:

Restart IIS service on the server.

Top 10 issues discovered from Dynamics AX Health Check

A very informative blog post by Bertrand Caillet covering important points for Dynamics AX best practices for health check, and it contains a sub links under main points. I am glade to share it over my page.

1. Max Degree of Parallelism is not set to 1

2. No Pre-Allocation for Non Continuous Number Sequences with high consumption

3. Insufficient Auto Growth for Data and Log files

4. Processor bottleneck for Dynamics AX batch processing

5. Heavy Application database logging

6. Missing Clustered indexes

7. Wrong Index maintenance

8. Enabled debug in Production

9. Power Management set to Balanced

10. Kernel and Application are outdated and should be patched

The Premier Field Engineer team has been running several hundred of Dynamics AX Health Check worldwide and I thought it would be interested to share the most common issues discovered during onsite. Some of the following issues might look trivial but the reality is that despite all the literature that exists today on the solution Dynamics AX, we can still see same repeated patterns, especially when default settings are used in production. Please note there is no logical order in this list.


1. Max Degree of Parallelism is not set to 1

The default setting from SQL Server installation is zero. If OLAP applications are running on the same SQL Server instance, the risk is that all CPUs are consumed (% Processor Time) and therefore impact performance of the OLTP application. To prevent this, we recommend to set MAXDOP to 1. Please note that in some situation when SQL Server batches or queries are run, using some degree of query parallelism can be beneficial. In this case setting Max degree of parallelism to 2 or 4 is probably a better value to take into account both types of queries.


2. No Pre-Allocation for Non Continuous Number Sequences with high consumption

This is a crucial setting in the Dynamics AX application that needs to be reviewed every few months on production to match the usage of the number sequences. Basically, number sequences can be Continuous or Non Continuous. When they are non-continuous, you can allow pre allocation per ID and therefore reduce the database calls and improve performance. When consumption is high, like several ID per seconds, we have noticed Lock Escalation events on the table NumberSequenceTable. This is especially true when Dynamics AX batch are running and generate thousands of records for Journals Lines creation or Sales Order Invoicing. Please read this blog post to better estimate this consumption.


3. Insufficient Auto Growth for Data and Log files

The default Auto growth is By 1 MB for Data and By 10% for Log files. If the initial size is too small, you will notice frequent auto growth events, resulting in negative performance impact. In the SQL trace, you can monitor such event with ID and see the duration of each auto growth event. The goal is to set an appropriate Auto Growth value on the Dynamics AX and TempDB Data and Log files to prevent frequent auto growth events during daytime. You can monitor such events and their duration in milliseconds in the SQL Trace with ID 92 and 93. One recommendation is to set the Auto Growth with a greater value, from 200MB to 500MB.


4. Processor bottleneck for Dynamics AX batch processing

Most of the customer running Dynamics AX are enabling only one AOS instance for the batch processing and several AOS dedicated for rich clients load which therefore limit the number of batch thread to the number of logical processor available on that single AOS instance. Also the setting on the AOS batch is often the default one with 8 maximum batch thread and 24 hours a day schedule . A good ratio to calculate the number of thread is to multiply the number of cores by 2, but this depends on the processes running and should be validated in testing. To overcome this limitation, you can set different batch thread for different time of the day and enable more AOS for Batch processing at night. For example, you can dedicate one AOS for Rich client load from 8 am to 6 pm and leverage it for batch processing at night. You can read this blog post to learn how to tune the number of thread required for faster batch execution.


5. Heavy Application database logging

This is another important setting in the Dynamics AX application that often has negative impact when over utilized. This feature allows to track all CRUD operations (including Rename primary key) on any field and any table of the database. This information will be stored in the table SYSDATABASELOG. You should not use this feature to track automated transactions run in batch jobs. You can monitor the table growth of SYSDATABASELOG and estimate the most expensive table set up with database logging. Please also notice that enabling the logging on field like CreatedDateTime or ModifiedDateTime will change the default behavior of InsertRecordSet from a single round trip to the database to a record-by-record operation. The three recommendations are:

  • Define a retention policy to only keep the latest 3 months for example so that size of table SYSDATABASELOG remains small. You can find the clean-up form under Administration | Inquiries | Database log | Clean up log.
  • Avoid heavy logging for transactional tables processed during the batch and prioritize activity that is absolutely necessary either for legal compliance or to meet other business requirements.
  • Avoid logging the columns CreatedDateTime or ModifiedDateTime of any table.


6. Missing Clustered indexes

This might not be the most common issues but it is definitively one of the most impacting one. All tables in an OLTP database should have clustered indexes, and you should investigate them by looking at the highly active tables, tables frequently involved in blocking or deadlock situations, tables that frequently incur the overhead of forwarded rows. Because the database model is changing during the lifecycle of the application with new customization and because indexes are managed from the Application Object Tree, it is important to periodically check the missing indexes from SQL Server Statistics. You can use the query “4-Analyze_SQL_Indexes.sql” from Dynamicsperf version 1.1.6 to find all missing indexes.


7. Wrong Index maintenance

Following the Missing clustered indexes issue mentioned above, the index maintenance is clearly one of the unhealthiest issue for Dynamics AX. Having a bad index maintenance or no index maintenance at all will have the same consequences: when statistics are outdated, Query Plan will use SCAN instead of SEEK operations and their performance will be badly impacted. The level of fragmentation is not that critical as such for performance, but it should be part of the weekly maintenance. The following is a recommended example:

  • Reorganize indexes that are larger than 1000 pages and are between 10% and 30% fragmented.
  • Rebuild indexes that are larger than 1000 pages and more than 30% fragmented using a fill factor between 85% and 95% depending on the frequency of the job execution.

It is also strongly recommended to run Update Statistics regularly with FULL SCAN, or with at least a 50% sample, as well as having Auto_Create_Stats and Auto_Update_Stats enabled. If you are running SQL 2008 R2 SP1 or greater, you can also enable Trace Flag 2371.


8. Enabled debug in Production

In the Dynamics AX Server Configuration Utility, you should always disable the two settings that allow user breakpoint and global breakpoint to debug X++ code. Even though you delete all breakpoints in the Application Object Tree, you will still suffer from a clear performance degradation around 10%.


9. Power Management set to Balanced

This is an easy one but almost never implemented in production since the default power management is set to balance. Changing it to High performance is highly recommended for all Windows Server 2008 used in Production. You can see this setting from Control Panel – hardware – Power Options or with the following command: “powercfg –getactivescheme”.


10. Kernel and Application are outdated and should be patched

Last but not least, maintain your Dynamics AX solution as much updated as possible. For example, you can notice that latest Rollup for Dynamics AX 2009 SP1 is RU8 and is already one year old. Several hundred of Hot Fixes have been released since and it is a best practice to apply those to leverage the latest fixes from the Product Group. The two recommendations are:

  • Patch the Binaries with the latest Kernel available. You can see the latest KB on the AX Support Blog. As of today, the latest one for Dynamics AX 2009 SP1 is build 5.0.1600.1824 from June 2013.
  • For the Application, you should upgrade to latest RU available, but you can also proactively check the list of individual Hot Fixes relevant to your business logic.

As you can see this list is not exhaustive and we could elaborate hundred of issues discovered from existing Dynamics AX live instance, but I do hope it can help you remediate some of the current issues you may experience. I will also encourage you to read the great article written by Arvind Shyamsundar on MSPFE blog regarding the 10 top SQL Server Issues uncovered by the SQL Server Risk Assessment Program.

Finally, please contact your Microsoft Premier Technical Account Manager if you will like to receive guidance from the Premier Field Engineering.

Source: Dynamics AX in the Filed

Integrate Microsoft Dynamics AX analytic components with external data sources

Data warehouses are a popular solution for providing analytic capabilities to users. Until recently, data warehouses were the only reasonable solution for building robust analytic capability. However, as applications become easily interoperable and as technologies such as in-memory databases and OLAP become cost-effective and simpler to use, building a data warehouse is not the only solution to meet analytic requirements.
Table below presents several architecture options for integrating external data with the prebuilt
analytic solution; a data warehouse is just one of the options. The columns represent architecture options, whereas the rows represent the benefits and cost implications of each option.

image

When most data is in Microsoft Dynamics AX (assuming that Microsoft Dynamics AX is the
predominant  source of data in the organization), you have two options.

The data mash-up option is best suited to an environment where capable users author and publish analyses for the use of others. This option relies on client tools such as Excel PowerPivot. Microsoft Dynamics AX 2012 enables Microsoft Dynamics AX queries to be published to data mash-up tools through OData feeds, or as data exports to Excel.

You can bring external data into Microsoft Dynamics AX either through services (data services consumed by means of inbound ports) or as batch jobs that are executed periodically to import data into tables. With this approach, external data is represented as read-only data within Microsoft Dynamics AX. The benefit to this approach is that external data appears as native Microsoft Dynamics AX data to Microsoft Dynamics AX tools. You can create analytics, reports, and inquiry forms that use the combined data.

A more complex approach involves integrating external data directly into the prebuilt BI solution.
With this option, a BI developer adds another data source to the prebuilt BI solution by using Business Intelligence Development Studio. Additional data tables are brought into the DSV by using the new data connection. It is possible to create dimensions and measures by using the new tables in the DSV.

The traditional ETL-based data warehouse option is suited to scenarios that require complex
transformations or large volumes of data. Although this option is more flexible in terms of capabilities, it is also the most expensive to implement and manage.

You might want to build a data warehouse to implement the following scenarios:

■ Integrate external data sources with Microsoft Dynamics AX data In this approach, the Microsoft Dynamics AX implementation serves as one of many corporate applications.
Although Microsoft Dynamics AX contains some of the corporate data, other systems contain
a considerable portion of the data. To make decisions, data must be combined across systems, and the data warehouse serves that need.
■ Incorporate legacy data into Microsoft Dynamics AX analytics Most organizations
migrate recent data when implementing Microsoft Dynamics AX. Legacy data is still
maintained in read-only instances of legacy applications. Although legacy data is no longer
used for operational purposes, it is required for historical trend analysis. A data warehouse
serves as the repository where legacy data is combined with current data.

Although Microsoft Dynamics AX 2012 does not directly support the creation of a data warehouse schema, the following artifacts generated in Microsoft Dynamics AX 2012 can be used to build a data warehouse:

■ The DSV generated as part of the prebuilt analytic solution can be used within SQL Server
Integration Services when an ETL package is developed to extract data from Microsoft
Dynamics AX.
■ Microsoft Dynamics AX document services can be consumed as data sources based on Simple Object Access Protocol (SOAP).
■ Microsoft Dynamics AX queries can be exposed as OData feeds.

Reporting service deployment error for Dynamics ax 2009


Error: “THE FOLLOWING COMPONENTS HAVE NOT BEEN INSTALLED OR ARE NOT CONFIGURED CORRECTLY: AL.EXE, MICROSOFT DOMAIN – SPECIFIC LANGUAGE TOOLS”
This error message indicates that the following software components are not installed:

• Windows SDK for Windows Server 2008 and .NET Framework 3.5
• Microsoft Visual Studio 2008 Shell (isolated mode)


Error: “THE MICROSOFT.DYNAMICS.CLRBRIDGE.DLL FILE IS NOT LOADED”


1. Close the Microsoft Dynamics AX Reporting Project Deployment form.
2. click Start Menu ---> Dynamics ax folder ---> right click on “Dynamics Ax 2009 reports Deployment then “ then run as Administrator

Troubleshooting blocked SPIDS in AOS


In this blog post I will provide some details on how the AOS server manages it SQL connections and some tips on troubleshooting blocked connections in the database. All of my description is based on the SQL Server backend but similar techniques are applicable for Oracle also, only the DB tools are different. Let’s first start with quick primer on SQL connection management inside Ax.

When connecting to SQL Server, Dynamics uses ODBC APIs to connect to the database. There is a cost in establishing the connection and logging in the user , hence the AOS uses a connection caching mechanism that allows recycling of connections when not in use. Internally, the AOS keeps track of 3 types of connections which are:

· Regular application connection – All application code use this connection.

· RECID connection – There is a dedicated connection to the SystemSequences table. This is used by the RECID allocator inside the AOS.

· Read Only/SysLastValue connection – This is a shared connection that is used for SysLastValue and read only queries.

Note, that the AOS internally distinguishes between these connection types but externally when looking in the database or in the application it is not possible to differentiate between them easily. In fact if a particular connection is cached and then reused again it might end up being reused as a different type of connection than its original type although there are some restrictions on the types when reusing the connections

The connection cache is implemented as a FIFO queue where the connection is stored while it is not being used. By not being in use I mean that there is no active SQL statement from the AOS to the database backend using that connection. The AOS also keeps track of the state of the connections before putting them in the cache for reuse. If the connection is bad due to connectivity errors to the database or any other errors that would cause errors in the future, then that connection will not be reused and it will deleted which will close the connection to the database.

Now let’s see how to look at some of this information from outside the AOS. There are a variety of ways to look at the active connections in a database server. For our discussion we will consider two alternatives, one using the tools provided by SQL Server and the other from within Ax itself. Let’s first look at the option or using SQL Server. My favorite tool for a quick overview of connections is the “Activity Monitor” tool that is available in the SQL Server Management Studio. This tool can be found under the Management folder in the object explorer. There are lots of columns for each active connection but the Process ID (SPID) is the one of interest to us. When you first start an AOS server you will see 2 SPIDS which have “Microsoft Dynamics Ax” under the Application column. These are the connections which are currently opened by the AOS and they could be either active or an inactive connection in the cache.

SQL Server 2005

Dynamics Ax sessions in SSMS

SQL Server 2008 R2

image

From inside Ax, you can see some of the above information using the “Online Users Form”. The Client Sessions tab has a column called SPIDs that shows the connections that are currently active on a particular session. I should make you aware that you don’t get to see the whole picture when using this form. To start with you only see the active connections that are assigned to a session. This explains why sometimes you will not see any value in the SPIDs columns for some of the users. Basically it means that the user does not have any active connection to the database at that instant of time. Another limitation is that the SPID will be populated only if the client where you are viewing the form is connected to the same AOS as the other session. So if you have multiple AOS’ in a cluster you will not see all the active SPIDs in the system by opening a single instance of the online users form. You will have to open the form in separate clients each connected to a different AOS.

Now let’s look at how we can use some of the above information to troubleshoot scenarios where sessions are blocked in the database and how to get rectify the situation. You can again start with the Activity Monitor to look lookup the SPID of the blocked session. The activity monitor also gives you the SPID that it blocking any other SPID and also the DB resource that is causing the contention. You can then use the online users form to determine the owner of the session in AX for the blocked and blocking SPIDs. The form provides an ability to terminate an existing session in Ax. But you have to be careful in terminating the correct session. If you try to terminate the blocked session you will see that the online users form changes the status to “Ending – Blocked”. This state indicates that the AOS tried to terminate the session but it was not successful since this session has some open resources and it cannot be safely terminated. One option to solve this situation is to terminate the session that is blocking the other session(s). If the termination is successful, the database connection is closed and this will free up the DB resources for the blocked session(s).

In the online users form when you try to terminate a session sometimes you might see the status change to “Ending – Waiting for AOS”. This happens when you terminate a session that is not in the same AOS as the client that sent the terminate request. In this case the request is placed to the other AOS and it monitors for terminated session in the background and will it terminate it eventually when it processes the request.

In addition to the above techniques there are alternate techniques to troubleshoot blocking in the SQL Server database. You can query the database provided Dynamics Management Views (DMVs) to get more details on the resources that are being consumed or blocked.

I hope you found the above information useful and interesting. Let us know if you would like more information in related areas on how the AOS works and options to manage it. We would also like to hear any suggestions for improvements in any of the areas covered in this topic.

Financial Consolidations - Dynamics Ax 2009 (Part 1)

Financial Consolidations process:

3 steps to perform consolidation in Microsoft Dynamics Ax 2009.

I ) Consolidation company setup

II) Subsidiary company setup

III) Perform consolidation

I) Consolidation company setup:

Consolidation company creation: Consolidation designated company will not be available for any operational process except having consolidation entries posted in here.

Path: Dynamics Ax > Administration > Common Forms > Company accounts

clip_image002

GL Parameters setup:

Path: Dynamics Ax > General Ledger > Setup > Parameters > Ledger tab

clip_image003

Set value "Consolidated company accounts ' = True

System account:

Path: Dynamics Ax > General Ledger > Setup > Posting > System accounts

1. Balance account for consolidation differences

2. Profit & loss account for consolidation differences

clip_image004

Currency and Exchange Rates:

Path: Dynamics Ax > General Ledger > Setup > Exchange rates > Consolidate tab

clip_image005

The Exchange rates form displays an additional tab, Consolidate, when you select the consolidated company accounts field in the General ledger Parameters form. Closing rate field is used for balance sheet accounts and the value in the Average rate field is used for profit and loss accounts. Add exchange rates for each currency and specify 'Closing rate' & 'Average rate' for all currencies in this form (Overview tab will display all currencies, specify exchange rates & select each one of them and click Consolidate tab and consolidation rates).

Chart of Accounts:

Path: Dynamics Ax > General Ledger > Common Forms > Chart of accounts details

clip_image006

3. Closing (or) Average: Use Closing or Average options for utilizing rates specified in 'Consolidate tab' of the exchange rates form.

4. Historical : Use Historical to utilize exchange rates specified in the setup.

This process completes consolidation company setup for consolidations in Dynamics Ax 2009.

II) Subsidiary Company:

The subsidiary setup depends on chart of accounts setup, so following are possible alternative options.

Chart of Accounts Option 1: Identical Chart of Accounts

When this is the situation, the Consolidation account field is selected in the Consolidate Online form during the consolidation process to transfer the balances to the correct accounts.

Chart of Accounts Option 2: No Consolidated Chart of Accounts

In this scenario consolidated company does not have chart of accounts, here two alternatives to perform consolidation.

5. Enter a manual mapping on the Chart of Accounts in the subsidiary. This causes the mapped accounts to create automatically.

6. Do not enter any mapping. This causes the Chart of Accounts to be created in the consolidated company when data transfers from the subsidiary.

Note: This method is not appropriate for consolidation of a foreign currency subsidiary because conversion principles cannot be applied.

Chart of Accounts Option 3: Different Chart of Accounts

Having different chart of accounts in subsidiary & consolidated companies must be mapped to the consolidated company.

Map Chart of Accounts: (This process should be done for all subsidiary companies)

Path: Dynamics Ax > General Ledger > Common Forms > Chart of account details

clip_image007

Map Dimensions: (This process should be done for all subsidiary companies chart of accounts)

Path: Dynamics Ax > General Ledger > Common Forms > Dimensions

clip_image008

This completes subsidiary company setup and Consolidations. Please refer 'Financial Consolidations - Dynamics Ax 2009 (Part 2)' for next steps.

Note: This article has divided into 2 parts as first part describes about setup of consolidation & subsidiary companies and part 2 does contains 'Perform Consolidation' steps.

Currency Setup in Dynamics AX 2009

  1. Create currencies in Dynamics AX
  2. Currency setup in General Ledger module
  3. Setting company default currency


Create currencies in Dynamics AX

To create currency go to General Ledger > Setup > Exchange Rates. The Exchange rates form opens.

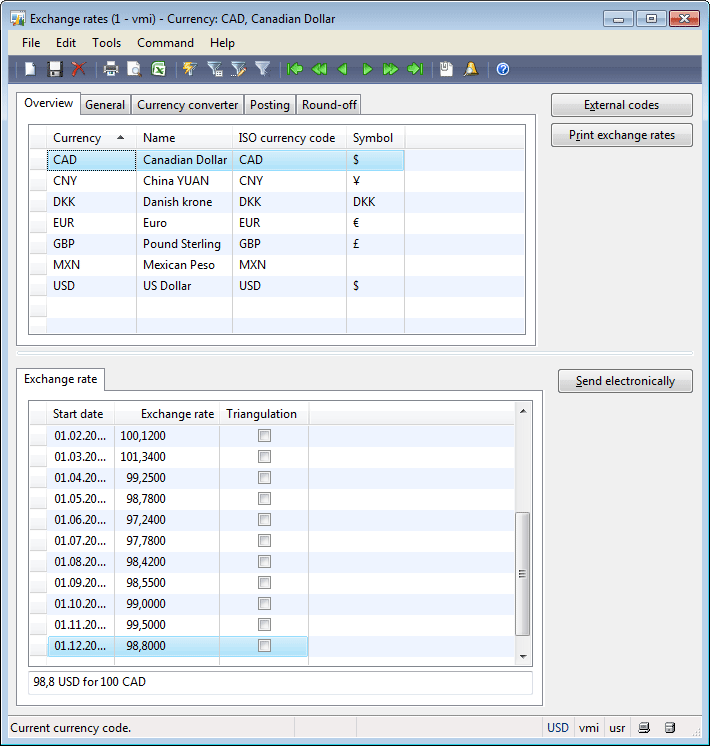
Exchange rates form

Exchange rates form

As you can see in above screen shot we have five tabs on this form. First is the Overview tab. In this tab we’ll create new currency. To create new currency press Ctrl + N, in the Currency field write new currency short name (3 characters limit), in the Name field write descriptive name for new currency, in the ISO field select ISO currency code for new currency and in the Symbol field enter symbol for new currency created.

In the lower pane of the Exchange rates form, are the exchange rates for currency. You can define exchange rates for each day. If you want to use one exchange rate leave the Start date field blank. AX will automatically use last exchange rate, if multiple exchange rates are available.

Next is the General tab which shows same information as in the Overview tab except the Gender field (Optional if you are not using Spanish check).

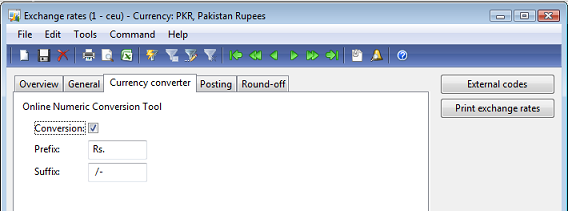
Third tab is the Currency convertor tab. Enable currency conversion by check mark on the Conversion field. Postfix and prefix are character you want to add before and after amount. Enter spaces before and after postfix and prefix fields to separate from amount.

I have created the Pakistan Rupees (PKR) with the following setup:

Exchange rates form, Currency converter tab

Exchange rates form, Currency converter tab

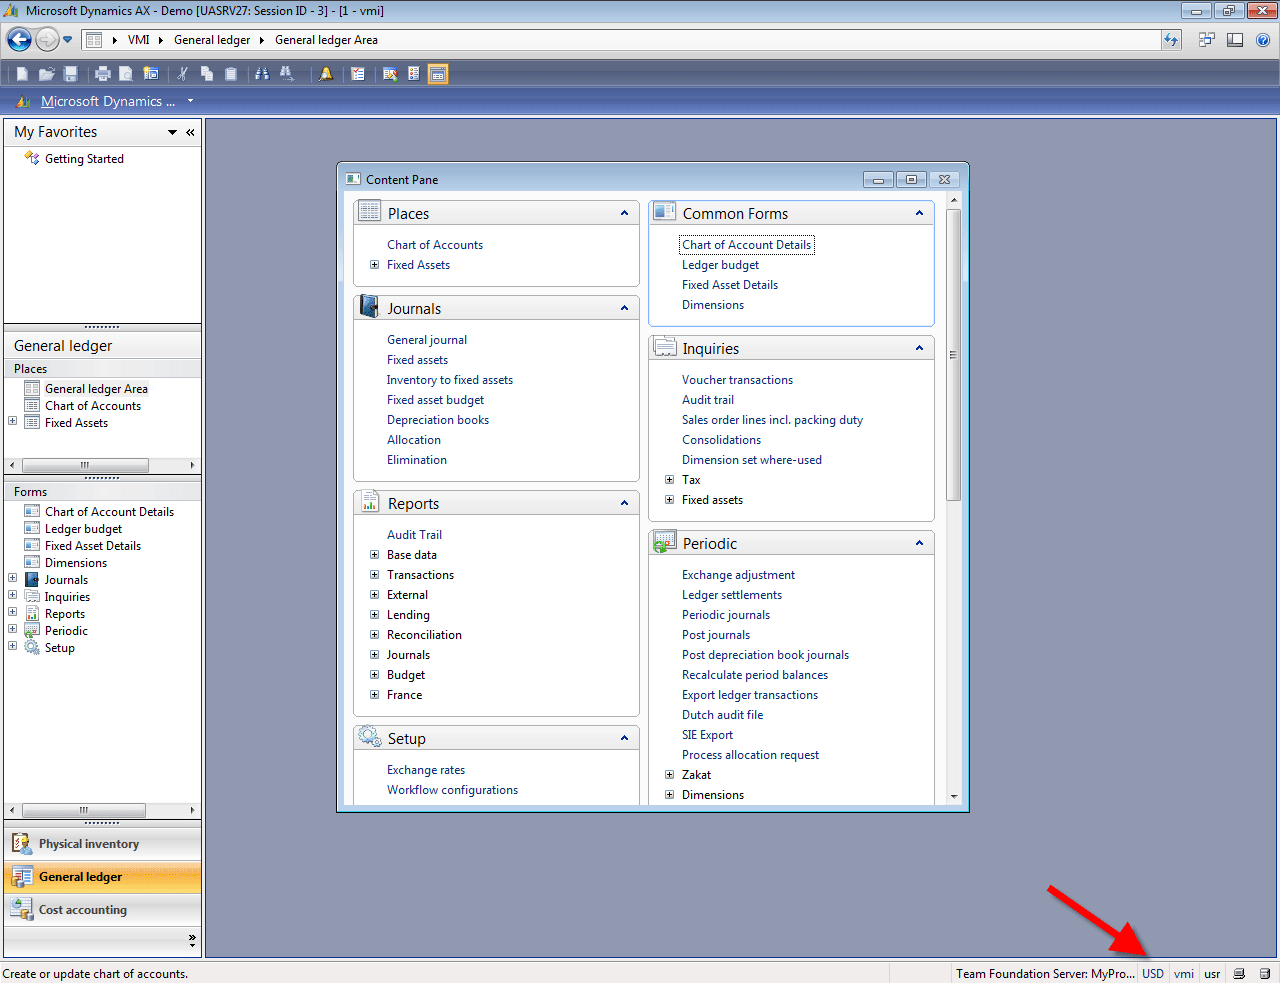
Now I want to view all my amounts in the PRK currency. To do this click the current currency icon located in the bottom right corner of the status bar.

Currency converter

Currency converter

The Currency converter form opens. Double click on the PKR currency.

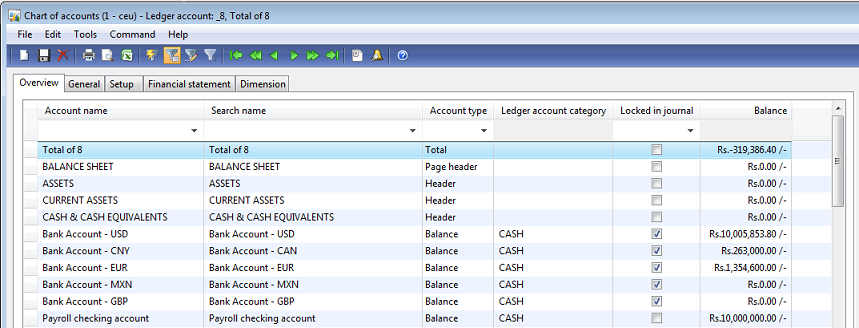
After doing above setting we will get the following result in the Chart of Accounts form.

Chart of accounts form

Chart of accounts form

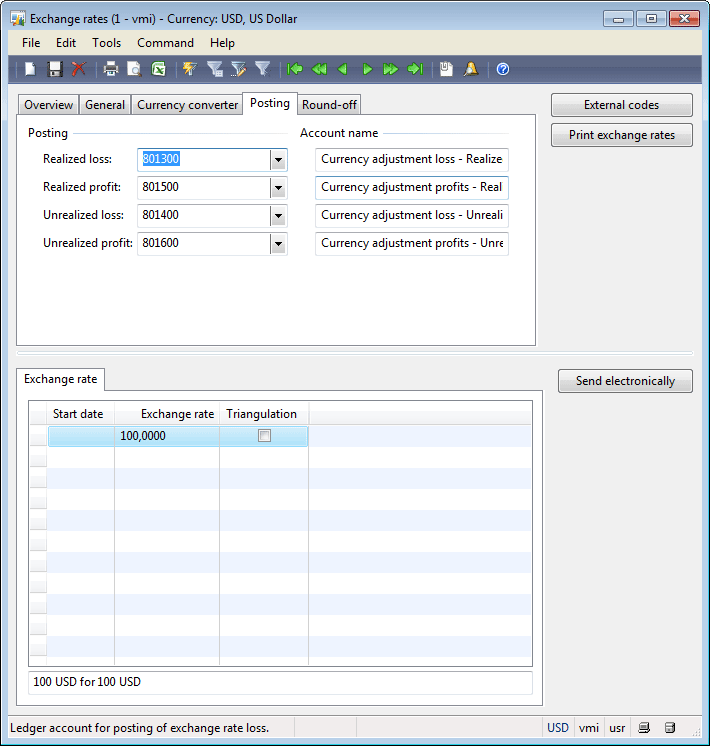
The Posting tab define Realized loss, Realized profit, Unrealized loss, Unrealized profit general ledger accounts due to currency exchange rate.

Exchange rates form, Posting tab

Exchange rates form, Posting tab

These settings depend on your company policies and weather you are using foreign currency for billing and payments. There’s a detail article about Realized and Unrealized profit and loss.

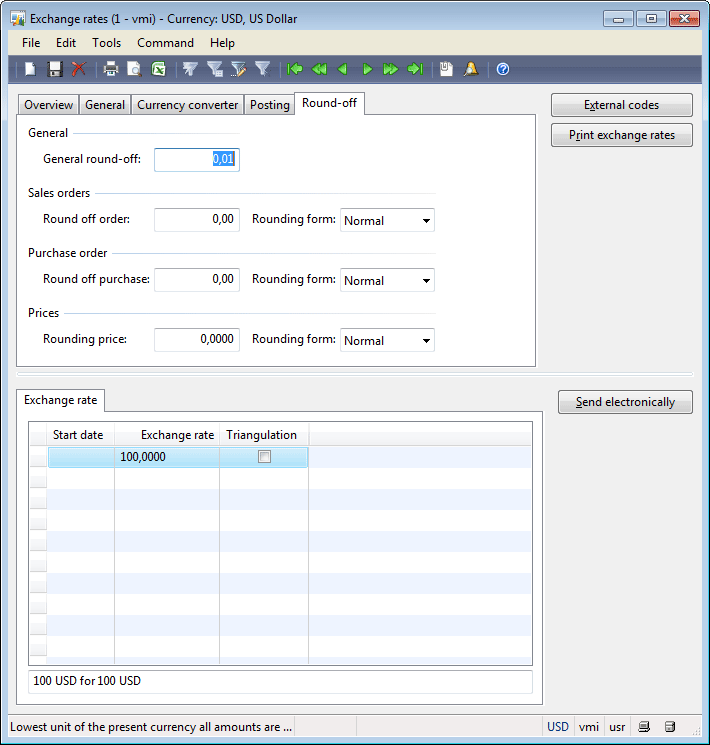
Last tab is the Round-off tab as the name shows it’s about rounding off currency.

Exchange rates form, Round-off tab

Exchange rates form, Round-off tab

General rounding-off applies to all modules and there are separate settings for Account Receivable, Account Payables modules and Prices.

Example: We have amount 6827.28. Below table describe how Round Off and Rounding form works.


Rounding form

Round off .01

Round off .10

Round off 1.00

Round off 10.00

Round off 100.00

Normal

6827.28

6827.20

6827.00

6830.00

6800.00

Upward

6827.28

6827.30

6828.00

6830.00

6800.00

Downward

6827.28

6827.20

6827.00

6820.00

6800.00

Currency setup in General Ledger module

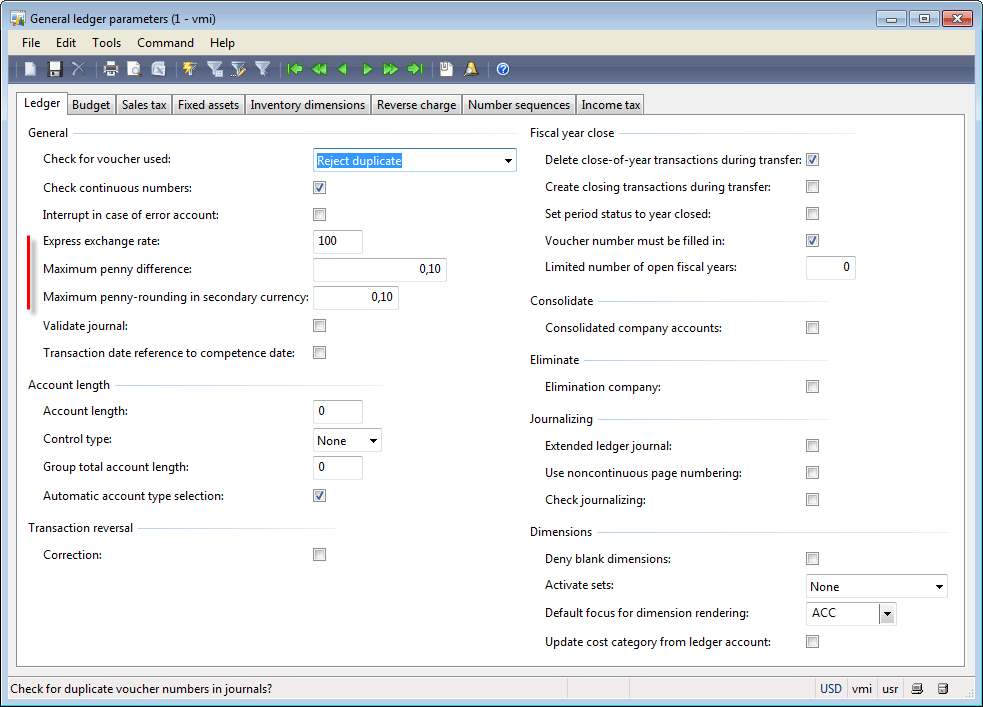
In General Ledger module go to Setup > Parameters. The General ledger parameters form opens. Go to the Ledger tab:

General ledger parameters form

General ledger parameters form

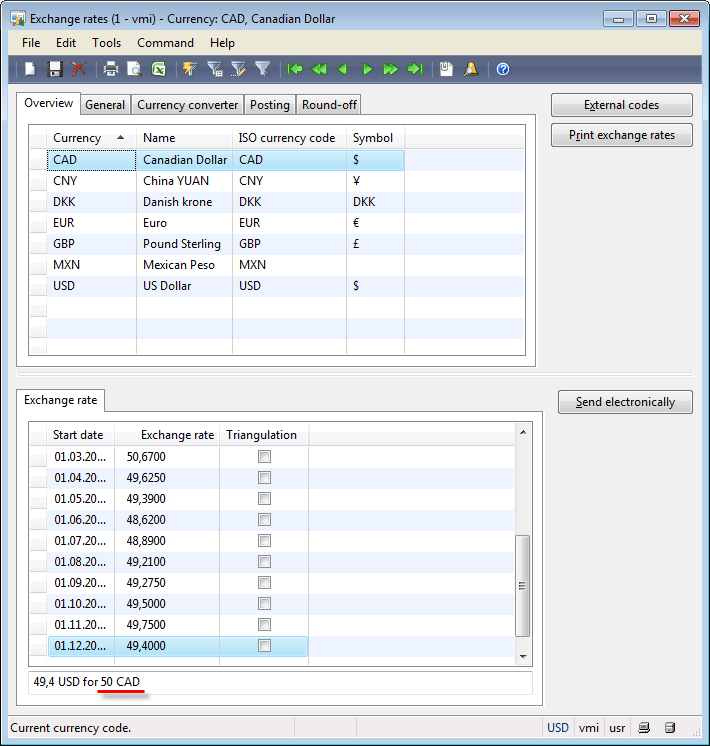
In the Express exchange rate field specify how much of your currency equals to 100 units of foreign currency. The value is used in the Exchange rates form.

Example: Enter the 50 in the Express exchange rate field. Save parameters. The Exchange rates form will have the following values.

Exchange rates form

Exchange rates form

The Maximum penny difference field contains the maximum difference between debit and credit amount in the voucher. The difference can appear when debit or credit amount is rounded (because debit and credit amount is rounded separately).

The Maximum penny-rounding in the secondary currency field contains the maximum difference between debit and credit amount in the voucher if this amount is recorded in the secondary currency.

Setting up company default currency

To set company default currency do the following:

Go to the Basic > Setup > Company information > Other tab > Currency field group >Currency field

You can select any currency you have created in the Exchange rates form

Model driven development in Dynamics AX

imparted from here


Did you know that Microsoft ships a cool business application that manufacturing and distribution companies use to run their business.

The name of the application is Dynamics AX and Michael will take you inside Dynamics AX to you about the innovative model-driven

architecture that was created to make this application very easy for partners to customize and extend for individual business and country requirements.

Step-by-Step Checklist for Debugging Batch Jobs in Dynamics Ax

Imparted from here

A. Enable Global Breakpoints

When debugging in the client, you want to set breakpoints that can be caught by the debugger. The following steps show how.

1. Launch the Microsoft Dynamics AX Configuration tool from the Start >Administrative Tools menu on your client computer. The first time this tool opens, you will be on the Original configuration. Create a new configuration named Debug. Click Manage and choose the Create Configuration menu option.

2. Enter a new name such as Debug, and choose copy from Original configuration and click Ok.

3. A new configuration is created and shown in the configuration tool. Click the Developer tab.

4. Choose the following options:

· “Enable global breakpoints to debug code running in the Business Connector or client” (required for this scenario)

· “Enable user breakpoints to debug code in the Business Connector” (optional for this scenario)

Note: Take special care that the Configuration Target remains set to Local Client since this is the only client you can set global breakpoints from.

B. Configure Your AOS to Run Under Your User Credentials

1. Launch the Services utility on your AOS server machine, and choose the AOS instance that you are configuring for debugging.

2. Right-click on your chosen AOS instance name and choose Properties. On the properties window, choose the Logon tab. Select “This account” for the Logon As option. Enter your full Domain account {e.g. contoso\YourName } and password credentials. This account must be the same user account as the account used for debugging batch code.

3. Click Apply once you have modified the user account.

4. You will be prompted to restart the service. Choose yes to restart the service (note: ensure other users are not working on this service before restarting it).

C. Configure the Dynamics AX Server to Enable Debugging

1. From your Start > Administrative Tools menu, open the Microsoft Dynamics AX Server Configuration tool. This tool has the same option to Manage configurations that you saw earlier in the client configuration tool.

2. Choose the Manage and Create Configuration option to create a new server configuration. As before, copy from the original configuration and choose Debug as the name.

3. Verify the AOS instance matches the instance you want to use for debugging.

4. Choose the following options:

· “Enable breakpoints to debug X++ code running on this server” (required for this scenario)

· “Enable global breakpoints to debug X++ code running in batch jobs” (required for this scenario)

Note: When you click Apply, you will be prompted to restart the service, and you should choose Yes.

D. Set breakpoints and start debugging.

1. Launch the Dynamics AX Client from the Start menu, and open the developer workspace.

2. Open the class you would like to debug from the AOT and set breakpoints at desired locations.

3. Launch the Dynamics Ax Debugger from the Start menu. The debugger must be opened directly in order to find and catch global breakpoints.

4. Schedule the batch job to run.

Example: To schedule work calendar delete to run in batch; launch the WorkCalendarDelete class in the AOT, click Batch tab, check Batch Processing check box and click Ok.

5. Wait for the debugger to catch the breakpoints.

Creating and posting Ledger Journal via code

static void InsertLedgerJournal(Args _args)
{
    LedgerJournalName           ledgerJournalName;
    LedgerJournalTable          ledgerJournalTable;
    LedgerJournalTrans          ledgerJournalTrans;
    LedgerJournalCheckPost      ledgerJournalCheckPost;
    NumberSeq                   numberSeq;
    ;

    ttsbegin;

    // Find LedgerJournalname Record
    select firstonly   ledgerJournalName where ledgerJournalname.JournalType == LedgerJournalType::Daily;

    //Create Ledger Journal Table
    ledgerJournalTable.JournalName      = ledgerJournalName.JournalName ;
    ledgerJournalTable.initFromLedgerJournalName();
    ledgerJournalTable.Name             = "Daily Trans";
    ledgerJournalTable.insert();
    numberSeq                           = NumberSeq::newGetVoucherFromCode(ledgerJournalTable.VoucherSeries);
    ledgerJournalTrans.Voucher          = numberSeq.voucher();

    //Create Transaction Line
    ledgerJournalTrans.JournalNum       = ledgerjournalName.JournalName;
    ledgerJournalTrans.CurrencyCode     = 'EUR';
    ledgerJournalTrans.ExchRate         = Currency::exchRate(ledgerJournalTrans.CurrencyCode);
    ledgerJournalTrans.AccountNum       = '140567';
    ledgerJournalTrans.AccountType      = ledgerJournalACType::Ledger;
    ledgerJournalTrans.AmountCurDebit   = 102.00;
    ledgerJournalTrans.TransDate        = today();
    ledgerJournalTrans.Txt              = 'good Product';
    ledgerJournalTrans.OffsetAccount    = '140567';
    ledgerJournalTrans.insert();

    info(strfmt('Journal Id: %1',ledgerJournalTable.JournalNum));

    // Post Journal
    ledgerJournalCheckPost              = ledgerJournalCheckPost::newLedgerJournalTable(ledgerJournaltable,Noyes::Yes);
    LedgerJournalCheckPost.run();
}

Resource Page for Enterprise Portal and Role Centers in Microsoft Dynamics AX 2009

This link below is intended to provide a consolidated view of relevant documentation, videos, solutions to known issues, links to related resources, as well as community sites for implementing Enterprise Portal and Role Centers for Microsoft Dynamics AX 2009.

http://community.dynamics.com/ax/b/axresources/archive/2012/02/13/resource-page-for-enterprise-portal-and-role-centers-in-microsoft-dynamics-ax-2009.aspx#.UUSBhypXtls

Not enough rights to use table 'Signature log' (SIGSignatureLog)


ERROR: “Not enough rights to use table 'Signature log' (SIGSignatureLog).”
SOLUTION: After installing AX5 SP1, it creates a new configuration key which it leaves unpicked. go into Administration > Setup > System > Configuration and tick the Electronic Signature tick box

Dynamics AX 2009 Keyboard Shortcuts

 
Viewing/Navigation options

Accelerator Keys

Task Description

Alt+F1

Show Navigation Pane (if it is not in auto-hide mode)This shortcut works from both MDI & SDI windows, so it is a good shortcut to get back to the main workspace.

Shift+Alt+F1

Enable/Disable auto-hide for the Navigation Pane

Ctrl+Shift+D

Toggles the Content Pane between Developer and Content modes.  Developer mode makes the content frame (where Area pages & List pages are viewed) restorable/minimizable so it is easier to work with developer windows.

Ctrl+F1

Open global search pane

Alt+F5

Toggle the docking status of a docking window

Alt+F6

Move to the next docked window

Alt+Shift+F6

Move to the previous docked window

Ctrl+F6

Move to the next MDI window

Ctrl+Shift+F6

Move to the previous MDI window

Ctrl+Shift+V

Open “Version control parameters” form

Ctrl+W

Open a new workspace

F11

Focus the Address Bar in edit mode (works from anywhere)

Alt+Left Arrow

Shortcut for the Back button on the Address bar

Alt+Right Arrow

Shortcut for the Forward button on the Address bar

From AreaPage, ListPage or developer (MDI) window


Alt+M

Show the Microsoft Dynamics AX Command Bar

Alt+W

Show Windows menuHint: do this then press “a” to close all windows.

Alt+V

Show View menu

Alt+H

Show Help menu

Alt

Show KeytipsPress the corresponding key to navigate directly to ActionPaneTab/Group/Button

There may be one or more ActionPaneTabs/Groups/Buttons with the same letter for a Keytip.  To execute a duplicate Keytip, keep pressing the letter until focus is on the one you want and then hit Enter.

Standard Forms 

Accelerator Keys

Task Description

Ctrl+N

Create a new record

Ctrl+S

Save current record

Alt+F9

Delete record(s)

Ctrl+F4

Close the active window (saving changes)

Esc or

Ctrl+Q

Close the active window (cancelling changes)

Alt+F4

Close the active window from SDI form (saving changes), Close the application from the main window

Ctrl+P

Print auto-report associated with current form

Ctrl+A

Select all rows in the currently active data source (works regardless of whether you are in a grid or not)

Alt+Down Arrow

Drops down a lookup field or drop-down-list

Ctrl+Alt+F4 or

Menu + G

Go to Main Table Form

F10

Activate the form’s menu bar (File, Edit, etc.)

Enter or Tab

Move to the next fieldEnter will skip over buttons and will move to fields across tabs.

Tab will navigate to buttons and will always stay on the same tab page.

Shift+Enter or Shift+Tab

Move to the previous field (same caveats as previous row)

Ctrl+Shift+Home

Go to the first entry field in the form

Ctrl+Shift+End

Go to the last entry field in the form

Ctrl+Page Up

Go to the previous field group

Ctrl+Page Down

Go to the next field group

Shift+F10

Open context menu for current field

Page Up

Move to the previous page of records

Page Down

Move to the next page of records

Ctrl+Home

Move to the first record

Ctrl+End

Move to the last record

F5

Refresh all data sources on the current form

Ctrl+F5

Restore only the active record

Filtering Commands

Accelerator Keys

Task Description

Ctrl+F

Find by Field (clears previously applied filters)

Ctrl+K

Filter by Field (appends to previously applied filters)

Alt+F3

Filter by Selection

Ctrl+F3

Open Advanced Filter window

Ctrl+Shift+F3

Clear all filters

Within a Grid


Ctrl+G

Enable/Disable Filter by Grid

Ctrl+Up Arrow

From a grid cell, move focus to the Filter by Grid input cell for that column (Filter by Grid must be enabled)

On a ListPage


Shift+F3

Focus the Quick Filter (“Type to filter” area)

Focus in Quick Filter


Enter

Execute/Clear Quick Filter

Down Arrow

Drop down the Quick Filter’s Field Chooser menu

Actions Specific to Grids 

Accelerator Keys

Task Description

Ctrl+E

Export to Excel (only contents of grid)

Ctrl+C

Copy:1)      If Single cell is selected, copies just that cell contents

2)      If the entire row is selected or multiple rows are selected, copies values for ALL fields on all the rows (including those off the grid)

Up/Down Arrow

Move focus to the next/previous record, unselecting the current record

Ctrl+Up/Down Arrow

Move focus to the previous/next record, leaving the current record marked and not marking the newly focused record

Shift+Up/Down Arrow

Move focus to the previous/next record, leaving the current record marked and marking the newly focused record

Ctrl+Shift+Home/End

Mark all records between the currently selected record and the first/last record

Editable Grids


Shift+Space

Mark the current record, leaving previously marked records marked.

Read-only Grids(such as on a ListPage)


Enter

Execute default action (only on ListPage grids, usually opens the corresponding details form for selected record)For, Non-ListPage forms, Enter will move to the next field

Left Arrow

Move focus one field to the left.  If focus is already in the left-most column, hitting Left Arrow will “mark” the row.

Right Arrow

Move focus one field to the right.

Ctrl+Space

Mark the current record, leaving previously marked records marked.

Shift+Space

Mark all records between the current record and the top-most marked record (or the top record if none are marked), leaving previously marked records marked.

Shift+Page Up/Page Down

Mark all records between the currently selected record and the previous/next page of records.


AOT

Accelerator Keys

Task Description

Ctrl+D

Open the AOT

Ctrl+Shift+P

Open the Projects window

Ctrl+ O  orMenu + O

Context: DescriptionJob: Execute the job

Class: Run the main(Args) method

Form: Launch the form

Report: Run the report

Table: Launch Table Browser for this table

Menu + W

Open new AOT window, with only the current node

Ctrl+N

Create a new object

Enteror

Ctrl+Shift+F2

Edit an object

Ctrl+S

Save current object

Ctrl+Shift+S

Save all modified objects

Delete

Delete current object

F2

Rename current object

Menu + R

Restore the state of the current object from disk, cancelling any pending changes

Ctrl+Shift+I

Import one or more application objects from a file

Menu + X

Export the current node to an XPO

F7

Compile

Ctrl+P

Print the active application object (basically XPO contents)

Alt+Enter

Open the property sheet

Ctrl+F

Find window

Ctrl+G

Compare different versions of the application object

Alt+Left Arrow

Move the object to the level of its current parent node in the tree

Alt+Right Arrow

Make the current object a child of the nearest container above it in the tree

Alt+Up Arrow

Move the object one slot up in its current level of the tree

Alt+Down Arrow

Move the object one slot down its current level of the tree

Number Pad *

Expand all sub-trees under this node

Shift+F9

View breakpoints

Ctrl+Shift+F9

Remove all breakpoints

Source Control


Alt+I

Check the application object into the version control system

Alt+O

Check out the application object for editing

Alt+U

Undo check out

Code Editor 

Accelerator Keys

Task Description

Ctrl+N

Create a new method/job

Ctrl+S

Save current method/job

F5

Context: DescriptionJob: Execute the job

Class: Run the main(Args) method

Form: Launch the form

Report: Run the report

Ctrl+F

Find and Replace (Find tab focused)

Ctrl+H

Find and Replace (Replace tab focused)

F3

Repeat the last find

Ctrl+G

Go to the specified line

F4

Go to the next error/warning/task

F9

Insert or remove a breakpoint

Ctrl+F9

Enable or disable a breakpoint

Shift+F9

View breakpoints

Ctrl+Shift+F9

Remove all breakpoints

Ctrl+Space

List properties and methods for the selected object

Ctrl+Alt+Space

Lookup a selected label or text

Ctrl+Shift+Space

Go to the definition of the selected method

F2

List all tables

Ctrl+T

List all Extended Data Types

F11

List all enums

F12

List all classes

Shift+F2

List language-reserved words

Shift+F4

List built-in functions

Alt+R

Open the “Scripts” context menu

F6

Close the current tab discarding all changes since last save

F8

Close, and save the current tab

Ctrl+L

Delete the current line

Ctrl+Shift+L

Delete from cursor to the end of the line

Selection Modes


Alt+A

“Select Area” – Area Selection Mode – clicking and selecting an area in the editor occurs as in typical editors (default setting)

Alt+O

“Select Columns” – Block Selection Mode – clicking and selecting an area will do so in a rectangle starting from the initial mouse cursor position (entire lines are not selected)

Alt+L

“Select Lines” – Line Selection Mode – clicking a line will select the entire row, clicking and selecting an area will always select the entire lines.

Alt+U

“Undo Selection” – Unselect the current selection.

 Debugger

Accelerator Keys

Task Description

F5

Go

Shift+F5

Stop

F11

Step into function calls

F10

Step over function calls

Ctrl+F11

Step out of the function

Ctrl+F10

Run to cursor

Ctrl+Shift+F10

Set next statement

Alt+Number Pad *

Show next statement

Shift+F9

View breakpoints

F9

Insert or remove a breakpoint

Ctrl+F9

Enable or disable a breakpoint

Ctrl+Shift+F9

Remove all breakpoints

Ctrl+Alt+Line

Show/hide line numbers

Ctrl+Alt+V

View variables

Ctrl+Alt+C

Display the call stack

Ctrl+Alt+O

View output

Ctrl+Alt+B

View breakpoints

Ctrl+Alt+W

View watch

Ctrl+Alt+M

Toggle workbook mode

Ctrl+Alt+D

Restore default layout

Ctrl+F4

Close window

Ctrl+Shift+F4

Close all windows

Ctrl+F6

Next window

Ctrl+Shift+F6

Previous window

During code execution


Ctrl+Break

Break execution of currently running script.To open the debugger where the execution is stopped, when the “Are you sure that you want to cancel this operation?” dialog comes up, hold SHIFT and click the No button.